Back to top

F1 Platform

Ultrasonic Quality Inspection Platform

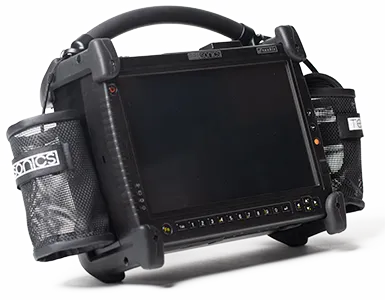
F1 is an ultrasonic device designed for quality control and NDE of resistance spot welds. F1 is a portable and simple-in-operation device capable of producing images of spot weld’s internal structures. In addition to weld image, this device performs estimation of the nugget diameter and compares it with predefined minimum nugget requirements.

Using the unique technology of multi-channel ultrasonic matrix transducer, F1 collects data from the surface and from the internal structures of the nugget. Special algorithms use this data to reconstruct the image of the spot weld and estimate the average diameter of the nugget area in real time.
Features
  • Single-frame and continuous data acquisition modes
  • Automatic and manual nugget size estimation
  • Automatic detection of scanning depth inside the metal
  • Two levels of user interface complexity depending on operator skills
  • Built-in reporting system and file storage
  • Application Metal stacks:
  • 2T and 3T
  • 0.6 – 2.4 mm plate thicknesses
  • Types of materials:
  • mild steel
  • high strength steel
  • dual phase ultra-high strength steel
  • aluminum
  • Coatings:
  • bare
  • zinc coating (galvanized, galvaneal)
  • e-coating
  • paint
  • Processor
  • Intel® Atom N270 1.6GHz
  • RAM
  • 2 GB DDRII SODIMM
  • Hard Disk
  • 2.5” 60 GB Solid State SATA
  • Communication
  • Gigabit Ethernet 10/100/1000Mbps
  • WLAN 802.11 b/g
  • Bluetooth 2.0 EDR Class 1 Module(optional)
  • Display
  • 10.2” TFT LCD display with LED backlight, Sunlight readable 500 nit
  • Resolution 1024 × 600
  • Resistive touch screen
  • Replaceable screen protector
  • Dimensions
  • 27 × 26 × 11.5 cm (10.6 × 10.2 × 4.5 in)
  • Cable
  • Length: 2 m
  • 52 coaxial channels
  • Fiberglass protective shell
  • External Ports
  • Two USB 2.0, one MiniUSB
  • Audio in/out
  • RJ45 Ethernet jack
  • PCMCIA, CompactFlash slots
  • 15 pin D-sub VGA port
  • Weight with Batteries
  • 4.5 kg (10 lb)
  • Temperature Range
  • 5º – 40º C (41º – 104º F)
  • Storage Temperature
  • -20º – 60º C (-4º – 140º F)
  • Power
  • Two 9-cell smart Li-ion batteries (7800 mAh)
  • Average battery run time: 9 – 12 h
  • External power adapter: 100 – 240 V, 50 – 60 Hz, 65 W
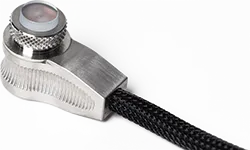
  • Transducer
  • 52 channels
  • Matrix diameter: 10 mm
  • Frequency: 15 MHz
  • Stainless steel housing
  • Rexolite hard delay line
  • SOFTWARE

    RSWA

    Resistance Spot Weld Analyzer
    RSWA is an ultrasonic device designed for quality control and NDE of resistance spot welds. RSWA is as a portable and simple-in-operation device capable of producing images of spot weld’s internal structures. In addition to live on-screen image, this device performs estimation of the nugget diameter and compares it with predefined minimum nugget requirements.

    Using the unique technology of multi-channel ultrasonic matrix transducer, RSWA collects data from the surface and from the internal structures of the nugget. Special algorithms use this data to reconstruct the image of the spot weld and estimate the average diameter of the nugget area in real time.
    Features
  • Single-frame and continuous data acquisition modes
  • Automatic and manual nugget size estimation
  • Automatic detection of scanning depth inside the metal
  • Two levels of user interface complexity depending on operator skills
  • Built-in reporting system and file storage
  • Application
  • Metal stacks: 2T and 3T; 0.6 – 2.4 mm plate thicknesses
  • Types of materials: mild steel, high strength steel, dual phase ultra high strength steel
  • Coatings: bare, zinc coating (galvanized, galvaneal), e-coating, paint
  • ABIS

    Adhesive Bond Inspection System
    ABIS is a software extension for our RSWA instrument and was developed to test adhesion bonds, e.g. hem flanges in the automotive industry, non-destructively. The software follows the operating concept of the RSWA-GUI and therefore offers an easy switch-over.

    ABIS displays adhesive coverage in a structure as a so-called C-scan, an planar top-view display. Thus, the operator is quickly able to determine position, orientation and extension of imperfections in their adhesive bond.
    Features
  • Real-time display of A- and C-scans
  • One side access
  • 2-dimensional 10 mm x 10 mm acoustic image of the adhesive coverage
  • Automatic determination of the width of the adhesive bead
  • Lateral resolution: 1 mm
  • Application
  • Metal:
    steel and aluminum; 0.7 - 2.0 mm thicknesses; coated, painted and bare
  • Adhesive:
    0.1 - 1 mm thicknesses; structural and sealant; pre-cured and cured
  • TRANSDUCER

    52 Element Matrix

    Features
  • 15 MHz probe
  • 8 x 8 grid
  • 1.25 x 1.25 mm pitch
  • Application
  • Spot welds: steel and aluminum
  • Adhesive bonding: steel and aluminum